
Blog
Do You Place A Stamp On Outgoing Documents?
If you place a stamp on outgoing documents at your customer’s request, DocBoss has functionality to make it easier. DocBoss…

What is a Stage?
Answer: The workflow of a document until it reaches a completed status.
What is a Stage List?
Answer: A Stage List is a sequence of Stages which creates a specific workflow.
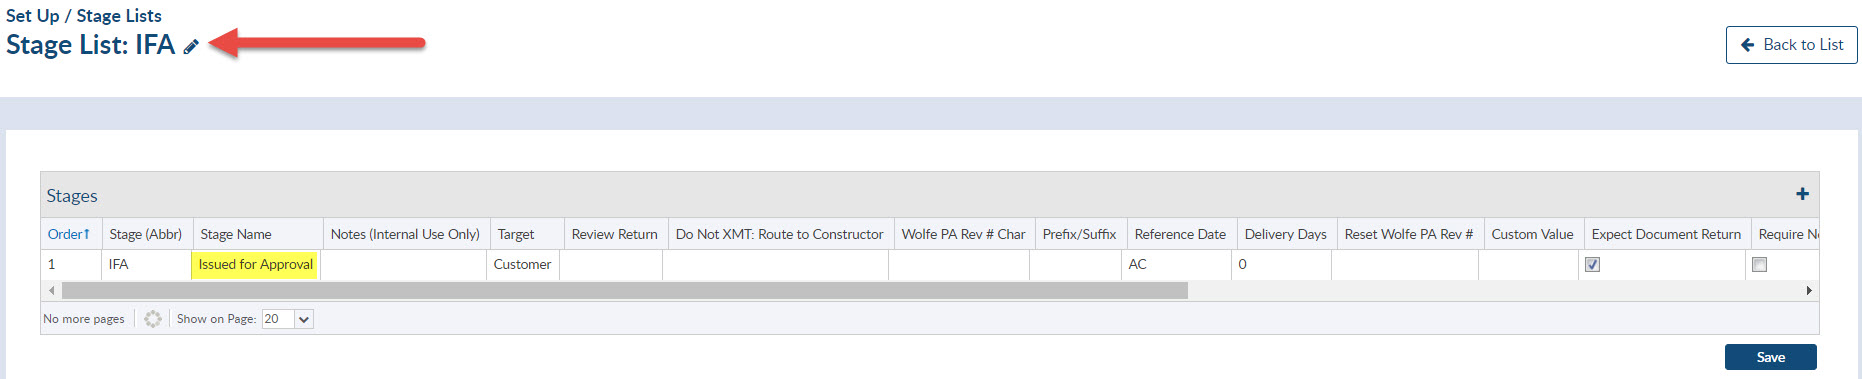
A typical example would be IFA- Issued For Approval. Note for each stage there is a Stage Abbreviation and Stage Name that must be defined.
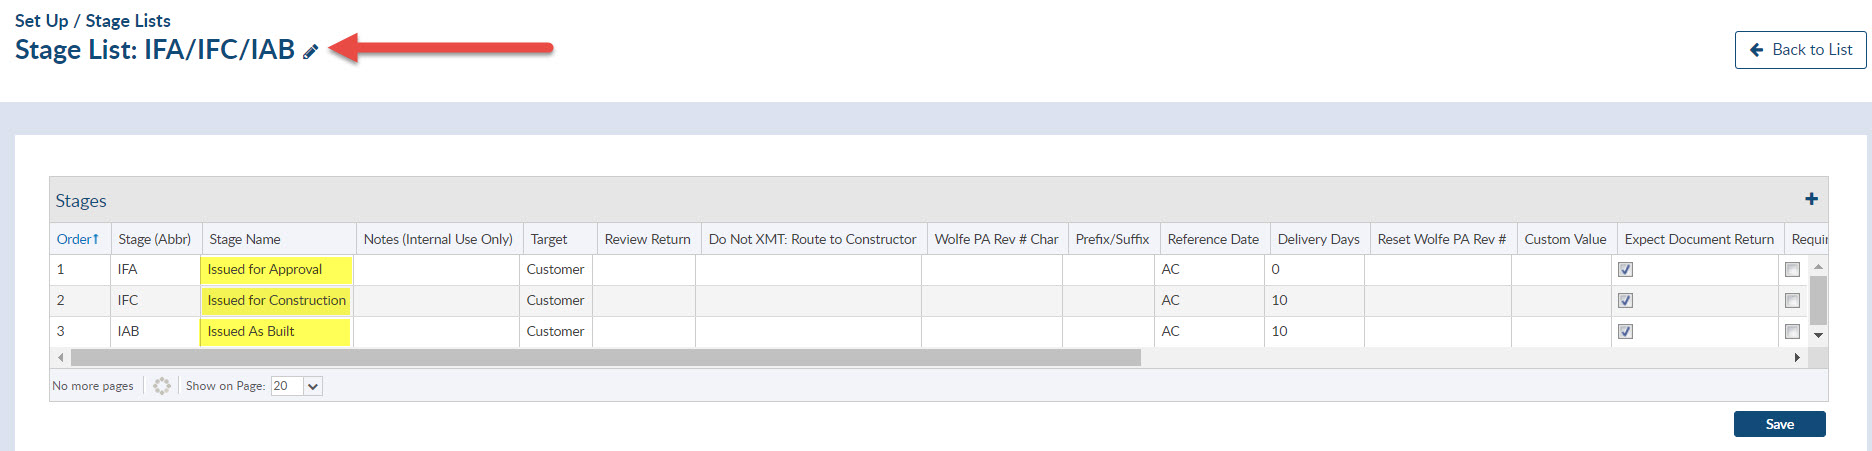
A Stage LIST is a combination of one of more stages to create a complete document life-cycle. It allows a single document to be tracked through a series of processes. A typical example requires a supplier to issue a document for customer approval (IFA), then issue for construction (IFC) to either their vendor or shop team and finally issue as built documents (IAB).
When submitting documents to customers for approval, it is expected that they will apply some form of approval status to the document, this must be tracked. I can continue to move back and forth to the customer until approval has been obtained.
Once the document has been marked as status COMPLETE (Approved) for the Issued For Approval stage, the document is auto-transitioned to the next stage IFC -Issued for Construction process to start.
In this example, we are just sending a copy of the complete document to the Sub-Supplier and are not expecting anything to be returned, so as soon as the document has been submitted, it will the transition to the next (and final stage) IAB – Issued As Built where we will be expecting a new document to send to the customer.
You may also create project specific stage lists. This allows the flexibility to work with unique requirements that may not be applicable to any other projects.
Please note that any changes made to lists at the project level will not be reflected on the Admin level lists.
Each document code is assigned a stage list via the Document Requirement grid. By default, DocBoss will always begin by assigning the Issued for Info/Review stage list. The other option by default is the no individual submission option. The no submission option means that the customer does not need to approve these documents, they simply need them to be provided in the document package.
If you begin a project using a particular stage list and part way through you need to change to a new stage list, all your existing document will be reset to status “X” to begin the process of the first stage of your new assigned list. When a new stage list is assigned DocBoss will look at the current stage and try to find a match in the new list. If it can find a match that document will keep its current status and if no match is found it will reset to X status. If you need to keep the current status of your documents you must include the exact same stage abbreviation in your new list. Once you created the new stage list and have assigned it in your project document requirement list, you may then go back and edit the stage names. The important thing is that the stages are case sensitive and must match exactly when you switch them.
Let’s take a look creating a stage list and populating that list with three items.
Let’s take a look at an example where you the supplier (fabricator) need to issue a drawing following a three-step approach. First, the document must be issued to your customer for approval IFA before construction can begin. Once the document has been fully approved it will move to the issued for construction IFC stage. Once the unit has been built the customer will require as-built drawings. IAB
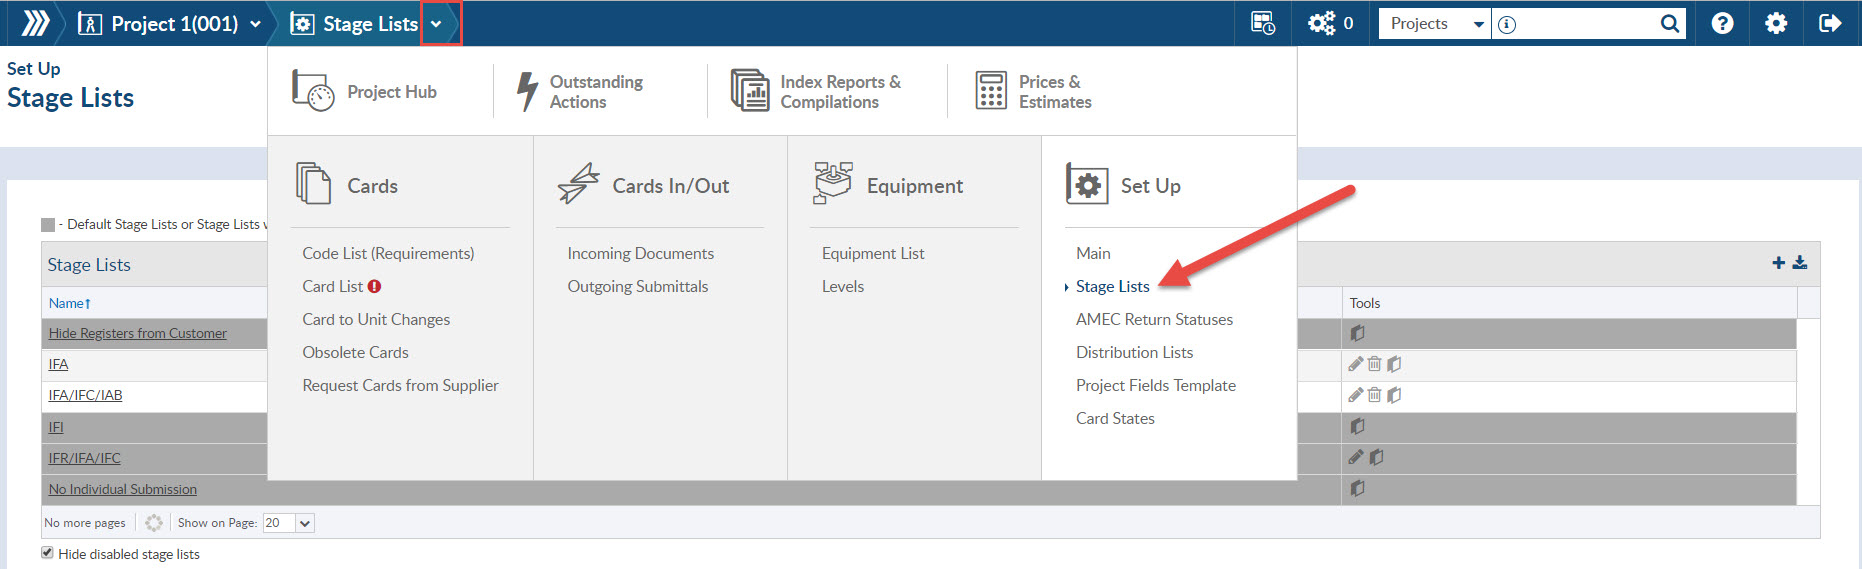
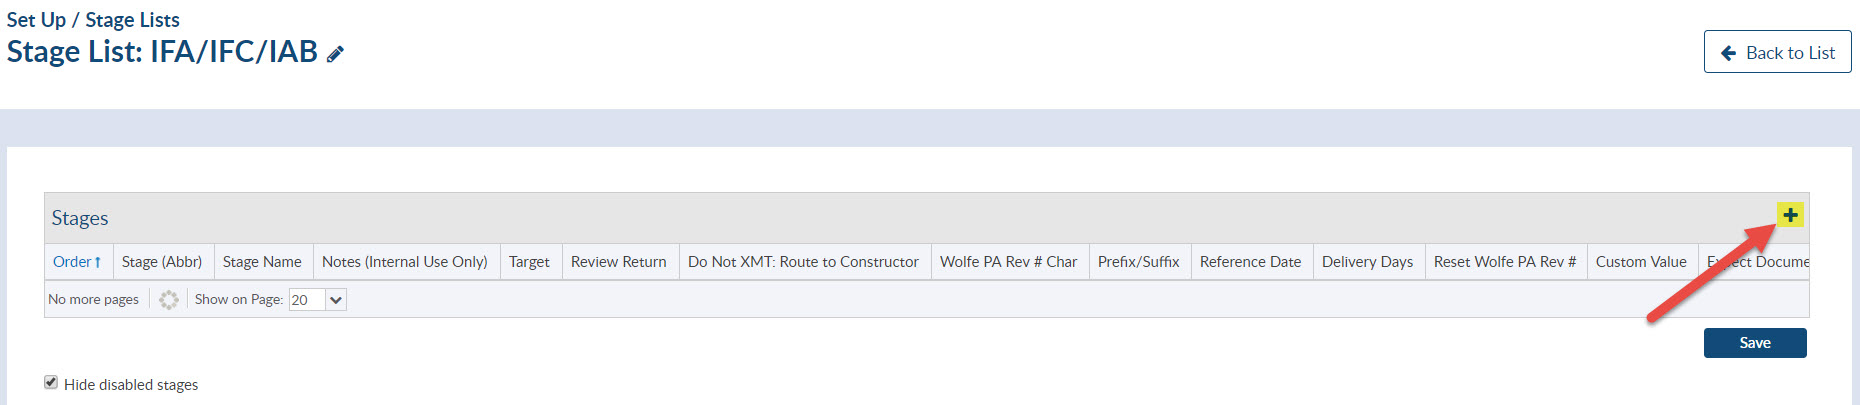
Begin by navigating to the setup/stages tab.
By default, three-stage lists are included. These cannot be edited.
To create a new custom stage list click the blue plus sign. Use a descriptive name such as IFA – IFC – IAB. This name will appear in the project Document List for selection. Try to make it descriptive, but not terribly long. Click save.

Click the stage list hyperlink to populate the items.
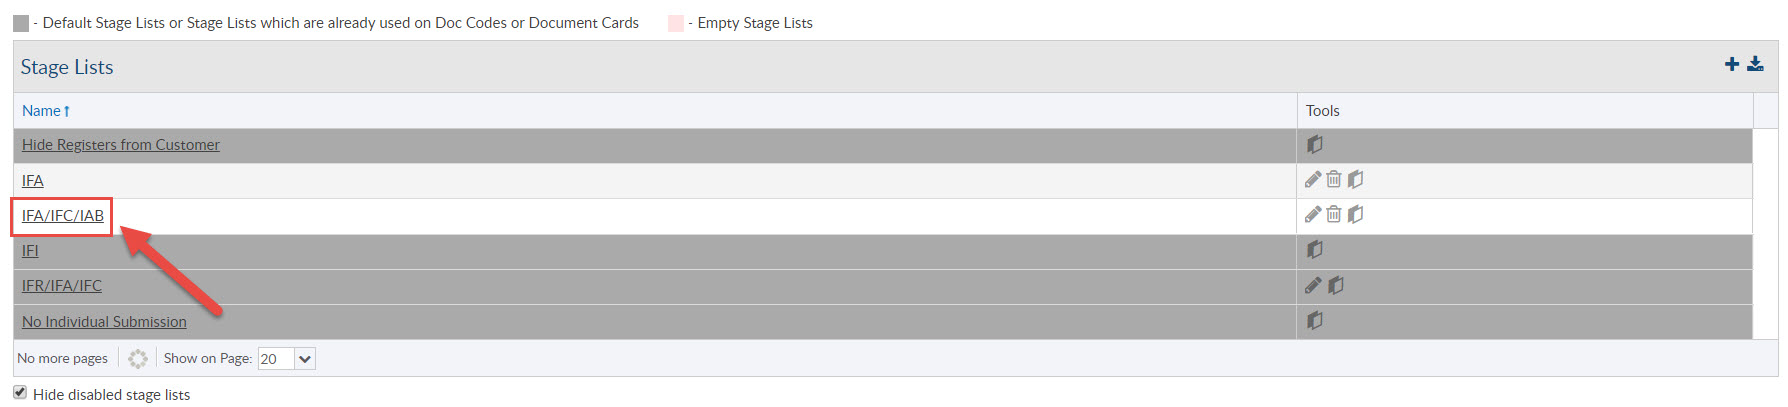
*Note GREY are DocBoss defaults, PINK indicates a Stage List has been started but the individual stages (workflows) have not been added, WHITE are complete lists.
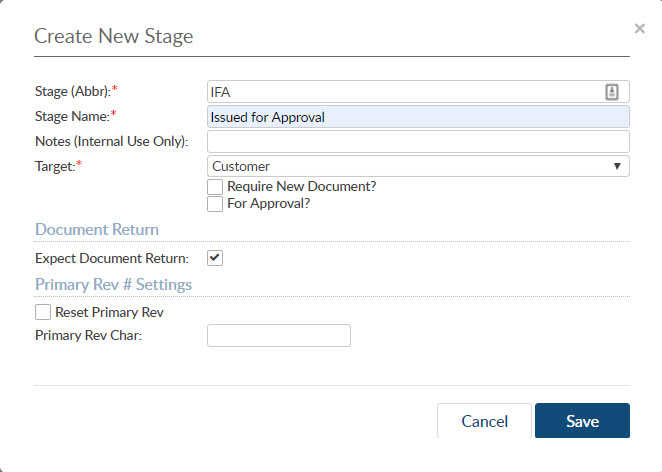
Click the plus symbol on the right to create the first stage. Following the example above your first stage would be called IFA (Issued for Approval). Click save.
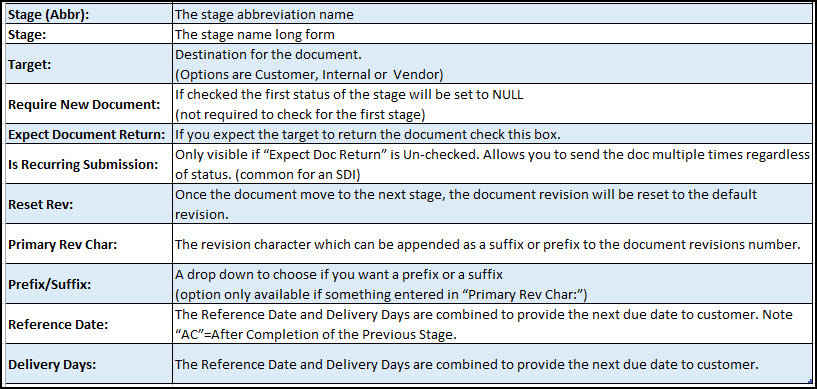
Next configure the options. Review the screen shot below for a description of each option. You will notice (with your second stage) there will be a few additional options.
*Note – If you would like to add additional text to stage names that have to be resubmitted when they are not at Stage Complete, the details are added to the Status List.
For more detailed information about setting up different revision numbers based on stages, see our article here.
If you are only adding one Stage (Workflow) you are now complete.
To add a second stage click the plus symbol and complete same steps as above.

Default stage lists can be configured in the admin section which makes them available to any user for any project.
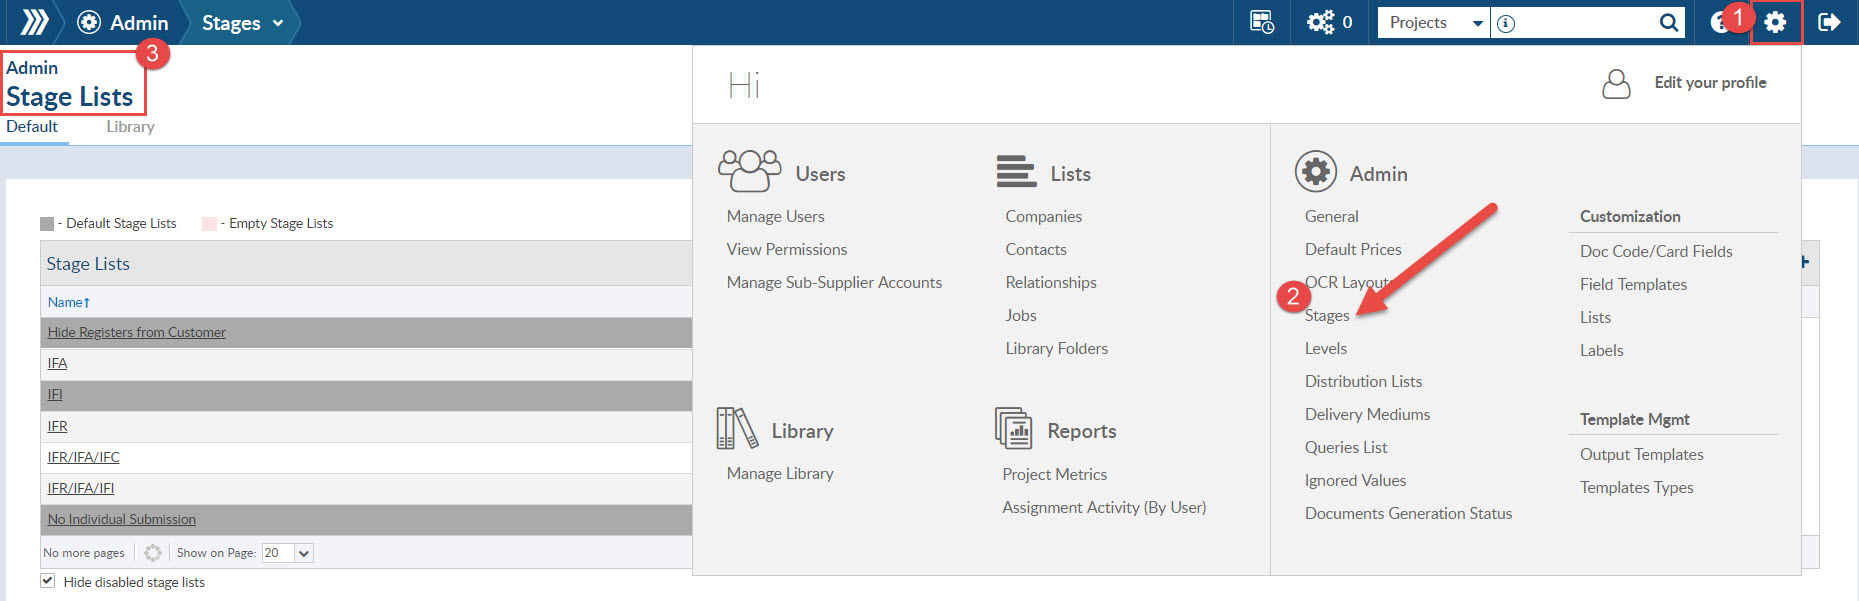
Admin permissions for the instance are required to create a default stage list.
Admin permissions to the project are required to create project specific stage lists.
For more examples and details about Stages, have a look at our video Working with Stages shown below.


DocBoss is the only true document control system for
suppliers. Book a quick demo to see how we help process
equipment suppliers make more profit with less pain.
If you place a stamp on outgoing documents at your customer’s request, DocBoss has functionality to make it easier. DocBoss…
Working With Your Equipment List Create combination columns There are times when the data from your system exists in 2…

With DocBoss, we use a number of words and definitions which you may also use for your document control work.…